
Shopping and cleaning a pinball machine
How to remove pop bumpers from the playfield.
Most people don't like to disassemble pop bumpers. This is not because it's very complicated to do. It's because assembling them back together takes a while and can be tricky. You have to work on the top and bottom of the playfield and solder. Usually bumpers are totally in the back of a playfield so if it's still in the cabinet you work in an uncomfortable position.
Here I explain the steps to remove and assemble pop bumpers. Note that depending on the brand and model there may be small differences, but as the design of pop bumpers has not changed for years the process is similar for almost every pinball machine ever made.
1. Remove the bumper cap. Usually it's secured using 2 small screws. Gottlieb and Bally games from the early eighties use bumper caps that snap in place on the bumper body using plastic tabs.
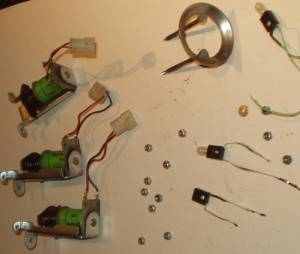
2. Remove the metal ring which is pulled down to kick the pinball away.
At the bottom side of the playfield: unscrew 2 nuts at the end of the long metal pins.
Take care not to lose the metal washers and remove these too.
Now you can remove the metal ring, just pull it straight up from the top of the playfield.
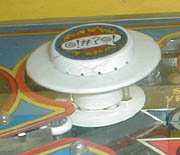
Bumper with cap removed.
3. Remove the light bulb. Just pull/twist it out.
4. Time to remove the pop bumper body and skirt. Do not continue if you can not solder !
Cut or unsolder light bulb wires at the bottom of playfield. Usually these are not wires but metal strips which are stapled in place.
Once these are loose, straighten the wires (remove sharp bends) and pull out the light bulb socket from the top of the playfield, using pliers.

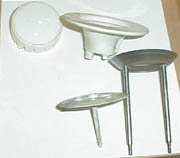
Bumper body and skirt removed.
Remove 2 screws which hold the bumper body to the playfield.
Remove body, skirt, spring and small plastic part. Just pull it up. Make sure you do not lose the small spring !
To remove the coil: remove the metal holder from the playfield (usually 3 screws).
Remove the 2 small screws to remove the middle U-shaped part so you can remove and clean and clean the plunger, spring, metal and bakelite link.
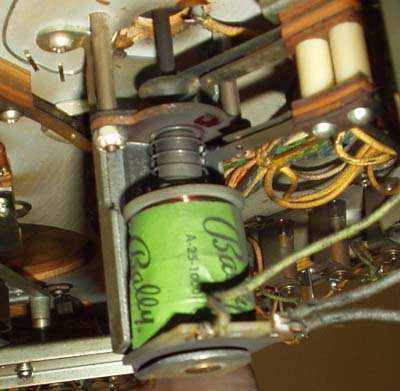
Bumper parts on bottom side of playfield removed.
That's it, you have successfully disassembled a pop bumper.
Assembly is a bit more difficult. First clean all parts and make sure you have replacement parts if necessary.
I usually start with the pop bumper body.
Take the bottom plastic, the spring, a new bumper skirt and the body, and assemble everything.
At the bottom side (where it fits into the small plastic which goes into
the playfield) there are 4 holes. 2 are for the screws and 2 for the light socket
wires. The bumper body has 2 indentations in its side where the metal ring
goes through. Compare their position to the holes in the playfield to make
sure you assembled everything correct and the holes match up. Secure everything into
the playfield with the 2 screws.
Now it is best to adjust the bumper switch, as you can still reach it with
the coil out of its way.
The long plastic pin in the center of the bumper skirt which sticks through
the playfield ends into a plastic spoon. To this part a blade switch is attached.
Clean the switch by swiping a business card through it. With a switch adjustment
tool you can now bend this switch so it is just not closed.
A small movement of the skirt should make the switch close. Test this.
Especially if you installed a new bumper skirt you have to pay attention to the
adjustment to this switch as it will be different.
You want this switch to be sensitive, as this means very reactive bumpers.
It the switch is open too far, slow rolling pinballs can roll past the
bumper skirts without activating them.
Note that on some types of older games (e.g. Gottlieb) there's an additional switch
which closes when the coil is activated and the ring is pulled down.
This switch is to inform the pinball machines cpu a pop bumper was activated
so it can increase score.
On these types of machines pop bumpers are independent parts and the decision to activate
the coil is not done by the cpu, because it reacts too slow. Instead a small driver
board exists which drives a pop bumper. To inform the logic of the game of this
(so points can be added) this additional switch has been added.
So just make sure this switch is clean and closes well.
Now it's time to install the light bulb socket. Replacing it with a new one is the easiest. If not, you have to check the metal strips are still long enough so you can solder it back to the cut parts. Another option is to solder short wires to the socket. It may not look original but is functional. Don't make the wires too long so they don't get caught by any moving parts or short against other parts. It is best to use small staples to hold them in place.
Time to assemble the coil. Check all parts, clean and replace if necessary. Clean the plunger. Usually this never breaks. Often the metal or bakelite plate is broken. Springs are also sometimes broken. Replace them, even if only a small part is broken off, as a shorter spring means that the metal bumper ring will not raise as high as it should, so it will hit the pinball in another position (and e.g. scratch the pinballs). Assemble everything together. Test by hand if the plunger moves up and down without friction.
Put the metal ring back and screw it at the bottom. Be sure not to over-tighten the nuts as the screw ends are not too strong !
Finish with a new light bulb and put the bumper cap back on.
If you're looking for pinball parts, then check out Pinballshop.nl (affiliate link).