
How to adjust switches on a pinball machine and make the game play more active
Adjusting switches is an important task to do. It can make a pinball machine play better and more fun. Badly adjusted switches may cause all kinds of problems on a pinball machine (worst case scenario: coils that burn), or can make the game no fun to play. It's not difficult to do, however you need to know how it's done. Explaining it in words is not easy, so I hope the pictures here help so you learn it.
Most of the switches used in a pinball machine are leaf switches. These are 2 (sometimes more) metal plates that have contact points on them. At their base they're stuck together by screws and some kind of isolator between them.
Tools to adjust a leaf switch
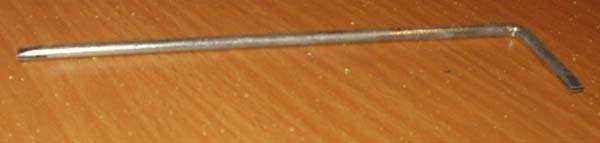
Normally a 'switch adjustment tool' is all you need. You can buy this from most pinball parts dealers. It's just a metal bar, usually bend in an L-shape so you have a short and long leg, for difficult to reach switches. At the ends there's a slit in it so you can slide it over the metal blade of a switch and bend this. So to 'adjust switches' means you bend the blades of the switch so the distance between the contact points becomes larger or smaller.
Always be careful when you bend switches. The blades can break if you bend them too sharp. Try to adjust a blade switch at the bottom of the stack (near the part where the blades are held together with screws) and not at the end.
As a blade switch consists of two blades, you have to know which one to adjust. The upper blade (usually the longest one) is the blade which moves when the switch is pushed in. Normally you do not adjust this. Only if you want to adjust the pressure needed to make contact, you can adjust this blade. The sensitivity of a blade switch is adjusted by changing the position of the shorter, stationary blade. By making the distance between the two blades smaller the switch becomes more sensitive, set them further apart and the switch becomes more insensitive.
First job when adjusting switches is to clean them. Clean the contact points of blade switches. Push them gently together and pull a business card or similar type of thick paper through them. That's all you need to do to clean most types of blade switches. Only on some very specific types of high-voltage switches (usually end-of-stroke switches on older games) you need a file. Using a file on low-power switches will destroy them ! Also do not use any kind of chemical cleaner as they can leave a residu behind.
Most switches you want to set very sensitive, but not too sensitive. A sensitive switch will make the game more lively (kickers, slingshots and bumpers will react better) and make the player enjoy the game more. It's very frustrating for a player to have a switch on a game which only registers when it's e.g. shot very hard or at a certain angle.
A switch which is set too sensitive will result in phantom closures. A slingshot may trigger itself over and over, or one pop bumper may trigger the one next to it too. You don't want this to happen. One test for this is to hit on the playfield with your fist, the vibration this makes may not trigger any switch !
There are two types of blade switches: normally open and normally closed.
Normally open switches are as their name says, open in normal condition. Only if they are
activated by a pinball the blades will close and make contact.
Normally closed switches are the opposite: they're closed all the time unless the pinball
opens the blades.
Most switches on a playfield are normally open. But you have to know what
type you're dealing with before you can adjust it.
Electronic pinball machines have switch tests. If you go into this mode and close a switch, the machine will say which switch it is. That way you can check a switch works well and the correct one gets detected (you have to look up the switch number in the manual). Sometimes the self-tests will say a certain switch needs adjustment. This happens when a switch has not been triggered in the last 30 games (or around that number). This does not always mean the switch needs adjusting, maybe it's in a position on the playfield where it was not hit by a ball. But go into the switch test and test if the switch registers.
Blade switches are self-cleaning. To be perfectly set up, blade switches should be adjusted that way that they clean themselves. They do this by moving over each other in a wiping motion. You do not want the contactpoints to touch each other perfect and stay in that position when the switch is pushed in further ! One blade should move a bit over the other, and thus wiping the others contactpoint clean.
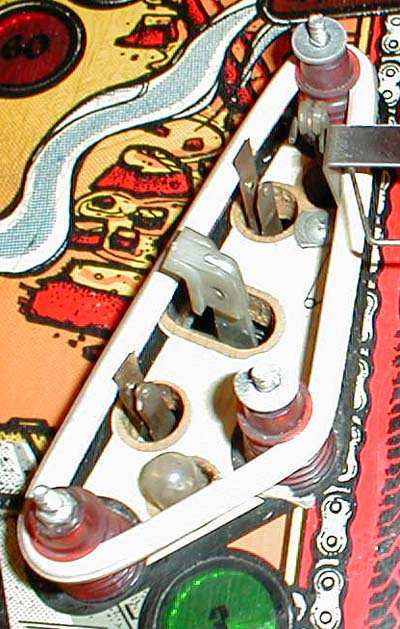
Pop bumper switches
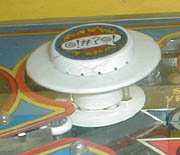
So how do pop bumpers work ?
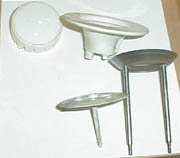
A bumper consists of parts above the playfield and under the playfield.
The most important parts above the playfield are the bumper skirt (the flat plastic which is just
above the playfield) and the bumper ring (the metal ring).
When a ball rolls towards a bumper, it will first touch the bumper skirt. As you can see in the picture of the parts, this flat plastic has a long pin in the middle which sticks through the playfield. Underneath the playfield this ends in a kind of plastic spoon, to which a switch is attached. The pinball makes the skirt move, the long pin on the skirt moves the spoon part which closes the switch. Now the pinball machine knows the bumper has been hit, and this will trigger the coil which pulls the metal ring down and thus kicks the pinball away.
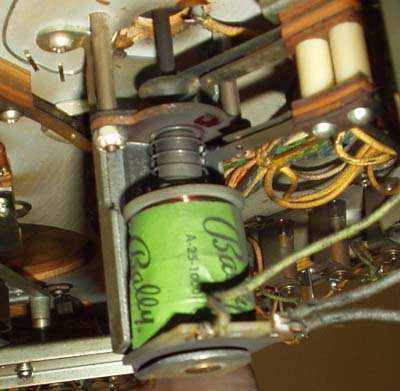
The goal is to adjust the switch on this spoon as sensitive as possible. But as bumpers make a lot of vibration when the metal ring kicks down, it may not be set too sensitive because then vibration from one bumper may trigger another one to fire.
In the picture you see 2 switches at this bumper. Not all types of games have this, more modern games only have one blade switch. Only the top one is important, this will trigger the coil to fire and its adjustment sets how sensitive the popbumper is. The bottom switch is only there to keep the score, it gets activated when the metal ring is pulled down.
So bend the upper switch so that it's almost closed, touch gently the bumper skirt and see if this makes the switch close. Then play a game and check that the switches are not set too sensitive and bumpers fire when the pinball does not hit them. If they are too sensitive then you have to adjust the switches again so the gap between the blades is a little bit bigger. It may be necessary to use a small mirror so you can see the gap between the blades.
While you are adjusting switches, also check the rest of the pop bumper assembly. Make sure the bakelite and metal plate are not broken and the bumper ring is held tight with 2 screws.
Slingshot switches
Slingshot switches (or other types of kickers) work similar to pop bumpers. Above the playfield are 2 switches, which just touch a rubber ring. A pinball rolls into the rubber ring, this bends back and closes one of the switches. This in turn activates the coil and the kicker arm kicks against the rubber band and the pinball away.
Both leaf switches are connected to each other, the cpu sees them as only one switch. Keep this in mind when troubleshooting the switch matrix, as non-working slingshots can be because the wiring between the two switches has a fault.
At first sight, the top switch in the picture is open too far. The bottom one looks better regarding
distance between the blades. But this still has to be tested.
With the new rubber ring on, the front blade of the switch should touch the rubber ring,
and the blade in the back should be close to it, but not making contact.
Try to bend switches from below the playfield and not only the top part which sticks above the playfield.
Slingshot switches also have to be tested for their sensitivity. When the slingshot has fired, its rubber ring will bounce back in position and vibrate a bit. If the slingshot switches are set too sensitive, this vibration may cause them to go off again, resulting in a slingshot which triggers itself over and over. It's a fine line between a switch which is sensitive enough and too sensitive.. You have to experiment a bit. You want to adjust them right on the edge. A pinball which rolls down against the rubber ring should get kicked away, although this depends also on the hardness of the rubber ring.
Keep in mind that rubber rings can differ in size (thickness). So if switches were already adjusted
and you put a new rubber ring on this assembly, you may have to check its adjustment again.
When I had finished shopping my Whitewater, none of the slingshots worked. Even in the switch matrix
they did not register when I pushed against the rubber. The switch matrix also did not
report them as bad or closed. So I was already thinking that some wires were broken of I had
a switch matrix problem. But when I pulled the rubber ring, suddenly the slingshot fired.
On closer inspection I learned that the new rubber rings I put on were much thicker than the old ones.
Therefor all slingshots switches were permanently closed, and because they were already when I
switched the game on, the cpu marked them as 'bad' and did not report them as closed in the switch test.
I just adjusted all switches to be 'normally open' and they worked fine.
End-of-stroke switches
To understand the importance of end-of-stroke switches (EOS) you have to understand how flippers work. On almost every type of pinball machine, a flipper coil is different from a regular coil. It's two windings in one package, one powerful one which uses high voltage, and a less powerful one which uses lower voltage. You need the high power winding to move the flipper bat up, and kick a pinball away. But if keep the flipper bat in the up-position (e.g. to trap a pinball) this can overheat and damage the flipper coil. So therefor there's a low voltage winding too. Once the flipper bat is in the up-position the coil switches to this lower 'hold' voltage, so it can stay in that position for minutes without damaging the coil. Therefor the EOS-switch is needed, to know when the flipper is in the up-position and to make/break the power/hold circuit.
EOS switches also exist as normally open and normally closed types. WPC games use normally open switches, older games usually have normally closed circuits. The example here is with a normally open type of game. If you have a normally closed one then inverse the logic (when the one type closes, the other should open and vice versa).
A misadjusted EOS-switch can influence a lot how flippers feel.
If it gets activated too soon, the coil is not able to work on full power for long enough.
Flippers feel weak, balls are not flipped away very powerful and far away targets
or steep ramps are maybe impossible to shoot.
If the EOS-switch is not activated at all, the coil will work all the time on high power.
It will overheat and loose power, and in the end get physically damaged.
Note that on WPC fliptronic games the switch to hold power is not done by the eos-switch
itself but through microprocessors. When the flipper is activated, the game over to hold-voltage
after a few micro-seconds. So even if EOS-switches don't close at all you can not damage
the coil. However this will still influence gameplay. EOS-switches also make sure that
a flipper in the up-position will not drop down when e.g. a pinball falls in it.
If you have a flipper bat in the up-position with a ball trapped on it and another ball
comes down from the playfield and hits the flipper bat hard, the hold power is not
strong enough to keep the bat in the up-position. It will fall down. This will close
the eos-switch and the coil will switch back to full power and raise. If the eos-switch
does not close again (or too late), the flipper bat will fall down and you might loose
the pinball.

This image shows a flipper mechanism on a WPC game (normally open) in rest. The flipper is down, the coil is not activated, and the eos-switch (left of the blue coil) is open.
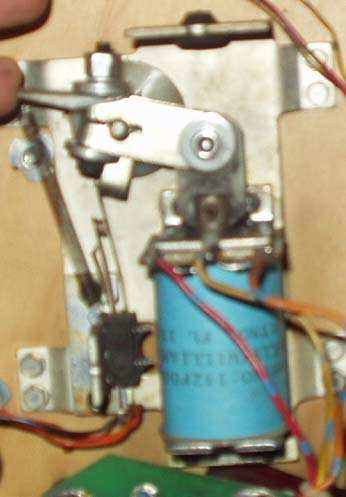
This picture shows the situation in the up-position. The coil is activated and the metal plunger is pulled in. This makes the crank rotate and the metal arm on it closes the eos-switch.
You want to adjust the eos-switch so it only closes when the flipper is (almost)
in the complete up-position. Not before, and certainly not half-way.
Only on games which are played continuously for hours and still get problems with
overheating coils you may want to adjust the eos-switch so it closes a bit sooner.
I'd say then between 3/4 and the full end of the length the flipper moves up,
as it'll then be a bit less long on high-voltage.
The top part often breaks off from eos-switches, and the arm of the crack can stick behind it. The result is that the flipper bat does not always return back to the lower position when the coil isn't activated anymore. You then have to install new eos-switches which are long enough. So especially take when adjusting the eos-switches that you don't break the ends.
Rollover switches
Rollovers exist is several types, flat plastic ones like in the picture, or star-shaped plastics. They are a very simple design: a plastic part sticks through the playfield and has a pin in the middle. This pin sticks through the playfield and rests onto a blade switch. In normal position the upper blade of the switch keeps this light plastic part up above the playfield. The weight of a pinball rolling over the target makes the blade go down and make contact.
So you if you adjust the top blade of the switch, on most types you can adjust
how high the plastic sticks above the playfield, or how much pressure is needed
by a pinball to lower it. Usually you do not have to adjust this, unless someone
messed with it.
More important is the position of the lower blade (and thus the distance
between the contact points of the switch) as it defines how sensitive the switch is.
Again, you want to make this switch sensitive without introducing false hits.
Usually the plastic the switch should close when the plastic is halfway pushed in.
Microswitches
Microswitches are totally different from blade switches. They just look like a little box with a small nipple extending from it and a metal wire on them (the 'actuator arm'). When the metal wire gets pushed down, the nipple goes into the small box and you hear a distinct clicking sound.
Adjustment here is done by bending the metal arm. Usually it sticks through the playfield. If it does not stick up high enough, a pinball can roll over it without activating the microswitch. If it sticks up too high, it can cause a ball trap, a slowly rolling pinball gets stuck behind it. So you have to test for both situations and adjust. Also keep in mind that in some positions (like loops on the playfield) the pinball can roll in both directions over the metal arm, because the way it's bent sometimes works fine in one direction but still causes a ball trap when a pinball goes in the other direction.
Usually there are 2 positions where the metal arm can plug onto the microswitch body. Sometimes it's necessary to switch the position so the arm has a higher angle.

The picture shows different types of microswitches. The actuator is the only difference between them, the switch part itself is the same. All different types have different part numbers. So if you want to replace a bad microswitch but can not order it somewhere, just take another microswitch and switch the metal actuator. Or you can buy just a generic switch (top of picture) on which you can bend the arm in any shape you want.
WPC95 games are known to use cheap microswitches which often go bad. So if you have a WPC95 with microswitches which sometimes register and sometimes not, (or even register fine in the switch matrix test but not during gameplay), then save yourself a lot of frustration, don't try to adjust them but just replace with a new microswitch.
Opto switches
Opto switches are a special type of switch. They don't have any moving parts. It's an optic (infrared) beam that is broken by a passing pinball. They consist of two parts, an emittor (which is an infra-red led) and a receiver (a led that is sensitive for infrared light).
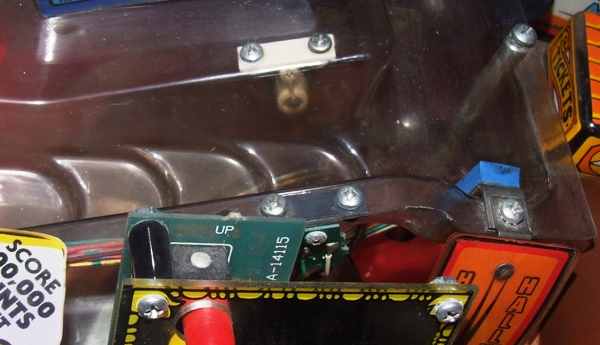
Opto switch on a Funhouse ramp.
Optos are often used at the entrance or on plastic ramps. Both parts are mounted on opposite sides. A pinball that passes breaks the beam. This is detected and communicated to the cpu.
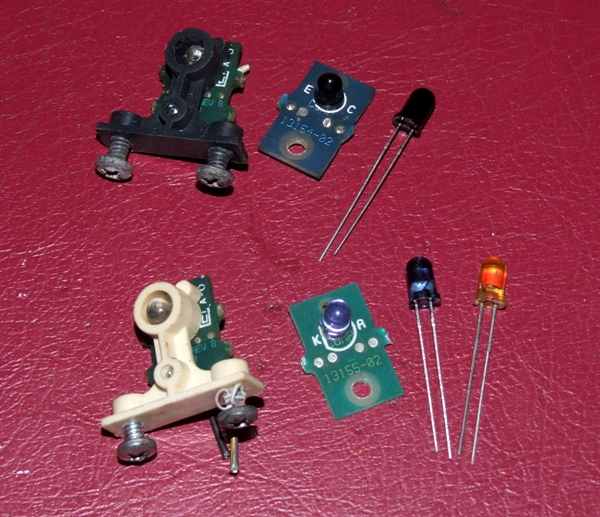
Different types of optos.
Receiver is at the top: dark green pcb, with dark colored case.
Emitter at the bottom: light green pcb, white colored case.
From left to right - complete assembly, pcb and the individual led itself.
When you have problems with optos - first start by cleaning them. Often they're just dirty, or the ramp they shine through (like in the picture above on Funhouse) is too dirty.
You cannot see the infrared beam by your own lights, but a digital camera can. To test if the IR-emitter works, just take a digital camera (a compact camera or the one in your cellphone will do) and look into the opto. You should see the led alight, as if it was a regular led. Of both components the IR-emitter led mostly breaks down.
Testing the IR-receiver is done different. Go into the switch matrix test, and block the beam from the IR-emitter. The switch should register in the test. As it's sensitive to IR light, you can use a regular flashlight to shine into it and it should also register. Note this does not work with flashlights that have leds - only with an incandescant bulb. You can also measure the receiver with a multimeter. Measure DC volts between ground and the grey wire on the pcb. You should measure 12vdc. Shine a flashlight into the receiver led and the voltage will drop and become close to 0 volts.
When you led (emitter or receiver) is bad, you have to replace it.
Buy a new one (complete pcb) or just desolder and replace the led itself.
Remember - Kathode = short leg, marked with K (or E) board, usually the flattened side of the led.
The leds need to be sensitive for 880nM wavelength.
Note your optos all require 12 volts to work. When all of them give an error, either suspect
the opto board under the playfield. This opto board is pretty simple, and contains some resistors and LM339 ics.
Also inspect the powerboard in the backbox for the presence of 12v:
on WPC: LED 1, testpoint 3, bridge rectifier BR1 and fuse F115. On WPC95: LED100, TP100, fuses F101 and F106.
Eddy switches
Eddy switches were designed by Williams and are only used on a few of their recent pinball machines. They exist in two types. The oldest ones can be manually adjusted (as used on Road Show, Theatre of Magic and Scared Stiff), while the modern version are 'auto-adjusting' (used in Cirqus Voltaire and Monster Bash), you cannot adjust them yourself.
The consist of 2 parts, a sensor pcb which detects the ball, and a driver board. On this driver board there's a led which lights when the pinball is detected by the sensor, and a potentiometer with which you can adjust the sensitivity.
Hold a pinball over the sensor. Turn the potmeter clockwise until the led lights. You want to set the switch as sensitive as possible, so turn just until the led lights. Vibrations can sometimes change the adjustment. If this is a problem and you often need to adjust it again, then you have two options. You can turn the potmeter a bit more clockwise, so you have a larger margin, but this will also make it less sensitive. You can also use a drop of nailpolish or superglue to keep the potmeter in position.
Eddy sensors often have problems with bad connectors. So if it's set correctly but doesn't register in the switch matrix test, or the led doesn't light at all, then check the connectors on the boards. If you cannot solder or use a multimeter then let someone do this for you.
Magnetic Reed switches
Just like Eddy switches, reed switches (MRS) work with magnetism. They detect a pinball that rolls over them. The switch itself looks like a long black plastic box.

There is nothing you can adjust with this type of switch. They either work or they're broken.
They also plug in directly in the switch matrix, they do not need a diode or extra driver pcb.
Williams started to use them in their WPC95 pinball machines (NBA Fastbreak, Cactus Canyon, Safecracker, No Good Gofers,
Cirqus Voltaire and Pinball 2000: Star Wars Episode One). Usually they're mounted underneath a plastic ramp,
as they can't sense through a thick material like the wood of a playfield.
Sega and Stern also use them on a few types of pinball machine.
If you're looking for pinball parts, then check out Pinballshop.nl (affiliate link).