
Gottlieb Q*Bert's Quest (QBQ)
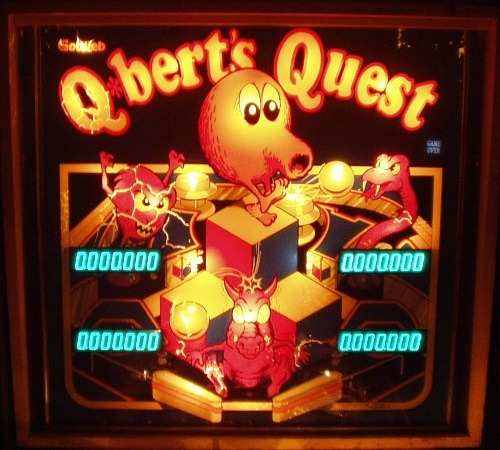
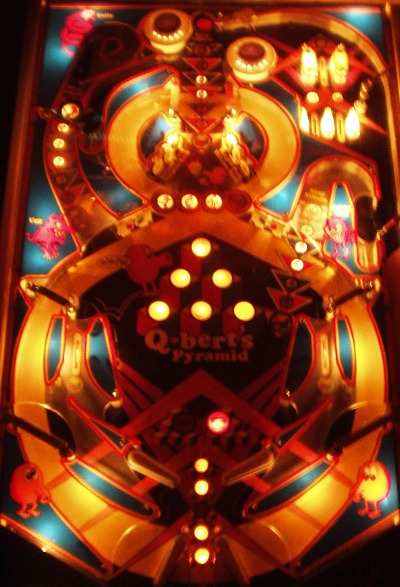
This is a very rare and special game.. back in the early 80ies when video games were king, Gottlieb made this pinball machine as a spin-off from their very successful Q-Bert video game. Unfortunately the pinball game was not a success. Probably because of its special layout with 4 flippers in X-layout, the game is more 'weird' than it is 'fun' (although I find it still fun to play). Only 884 games have been produced, of which an unknown number as a kit (a kit consists of a playfield and backglass, so you can convert another Gottlieb game).
Once you master the flipper layout the game is fun. The rules are quite simple, you cannot compare this to the more famous Gottlieb Sys80 games like Haunted House and Black Hole which are more complicated. Gameplay is fun though, it does feel like you're playing a video game with a pinball..
Similar to the video game, you have to light all fields in the pyramid to score points. You do this by hitting several targets and (rollover) switches. The 3 villains of the arcade game each have their own position on the playfield, with a row of lights in front of it. As time progresses, they light an additional insert towards you.. when a whole row is lit it takes away a lit cube from your pyramid. You have to defeat them and dim their lights by hitting their target, and then the next villain starts to attack you.
The game is fun to play.. it's Q-Bert ! cute-bert... and yes, this pinball machine is cute ! Especially the sounds I like a lot.
Testing and repairing the game
I bought this game in unknown condition. It was not possible to test it, as it was in storage and the head was separated from the cabinet. The seller said it was working.. but he knew nothing about pinball machines and had traded the game in on a slot machine he sold, so he could tell me whatever he wanted. But the game looked good. Although the original battery was still on the cpu board there was no sign of corrosion at all.. Electronics looked clean and complete. So even if it wasn't working, it looked restorable. The backglass and playfield weren't perfect, but weren't bad either. The playfield has mylar over it for the most part, only in front of villain targets there are some small wear spots.
I have experience repairing Bally and Williams games, but this was my first Gottlieb
System 80 game I was trying to restore. And I didn't want to mess it up !
I'd read enough about these games to know they are unreliable, and (like any other unknown game)
you have to be careful when testing a game, so you don't do more damage to it.
Clay's repair guide about System 80 games and the This Old Pinball tapes 5
were very useful. So I watched these first, took notes, before attempting to plug in the game.
When I had a long weekend I started working on this game. I did not want to follow the TOP tape completely, and make a test-bench and do upgrades to every board before even testing it. I just wanted to test the game, see what worked, and then decide what I was going to fix and upgrade first.
Plugging in the game, with only power to the powerboard connected. 2 leds went on ! That's good news.. I checked the voltages at the test points and these were also within range. This started to look good...
Next step.. testing the cpu board. And yes, I was even more lucky.
The cpu started and the blue displays lit with zeroes. Excellent !
The most complicated part of fixing a game, cpu repair, seemed not necessary on this game..
Seems that the seller didn't lie when he told me the game was working.
The driver board did not look good. One large resistor was burnt. I should've taken the schematics at this point to see what it was used for.. but I didn't..
I just wanted to try and play this game, see what was working. Putting a credit
on the game was not easy, later I discovered that the switch I used had a broken wire
which shorted to ground..
Anyway, a bit of messing around and I could start a game.
The ball came into the shooter lane. Yes ! I plunged the ball, switches registered..
then the pinball rolled into the kicker of the right villain.. and stayed there.
Oh well, after all this good luck with this game I knew there was something
which was going to disappoint me. Using a magnet I pulled the ball out of the
hole and played the game further. One flipper didn't work well. One pop bumper
didn't work. And the right villain kicker also didn't work.
The good news: playfield lights and switches worked fine.
Time to check the underside of the playfield now. Hidden in the back were 4 fuses.. and at the front was a label indicating what they were for. Yes, the pop bumper and kickers fuses were broken.
I put in new fuses, checked and cleaned the pop bumper switches. Also tested the large transistor on the popbumper driver board and to be sure I switched the 2 boards around (to see if the working bumper would still work). And yes, now both bumpers worked ! One bumper did 'stick' though, probably therefor it burned its fuse, so more adjustment of the switch was necessary. The pop bumper boards had already been upgraded btw, so I did not have to do this mandatory fix.
Now the 2 villain kickers. Their fuse blew again, and as it was 1 fuse
for 2 solenoids, I didn't know immediately where the problem was.
The coils looked good and were not burnt. Time-off..
I started to work on the boards, did Clay's upgrades to the power, cpu and driver board. When I was working on the driver board I replaced the burnt resistor and a bad transistor. I checked the schematics, and yes, this was for solenoid 2.. which was one of the villain kickers. That explained a lot.. maybe the coils were bad, maybe not, but at least the driver board had a problem in this part.
Testing again.. and yes, there was progress ! The fuse didn't blow anymore.. and the right villain kicker now worked fine !
The left villain kicker still didn't work. The switch which detected
the ball worked, as the game played a sound when it was triggered.
Time to test the coil then.. connect a wire to ground, and with the
other end I touched the coil lug (non-banded side of the diode !).
The coil fired, so I know there was power.. Next step, I grounded
the large metal transistor which I had just replaced..
and yes, the coil fired again !
So what did this teach me ?
Power was fine, and the connection from the transistor on the
driver board up to the coil was also fine.
Time to look at the schematics again. The driver board is quite simple for firing a coil. A signal comes from the cpu, which to a few components (2 transistors and 3 resistors) on the driver board. Time to look in detail at the parts I hadn't replaced... The pre-driver transistor was slightly out of spec. It wasnt shorted but wasn't perfect either. I replaced it.. success, the left villain kicker now worked too !!
Next problem then, the bottom left flipper (which is actually the right lower flipper in the schematics as it's controlled by the right flipper button) did not work. Well, it worked, but only if you held in the flipper button and it went up slowly. That problem I know from other games: it indicated that the coil is working on 'hold' power and not on full power. Probably a bad coil or end-of-stroke problem ?
There were no broken wires, everything measured ok. The paper coil wrapper was burnt so I replaced the coil. Still the same problem.. I started to give up, when I tried to measure resistance with my dmm again. No broken wires, everything made contact. There are just too many wires, with 4 flippers together in one place, some wires went to the other right flipper, while other connected both left coils too. And I measured continuity between most wires. Then I suddenly knew it.. I measured too much continuity ! I had checked the eos-switches, as I knew these were the problem, and they beeped out. Continuity. So you think the switch is closed and the blades make contact. I had cleaned and filed this switch before, so that was what I expected. But then I opened the blades.. and it still beeped ?! Seemed the continuity went throught the coil or other flippers ? I have no idea how Gottlieb coils work together with their eos-switches, especially for these 4 flippers in criss-cross postion. I unsoldered the wires to the eos-switch, tested again.. There was no continuity when this switch was closed. Problem found !
I replaced the eos-switch and tested again.. and now this flipper also worked fine, very powerfull !
Problem-solving on Gottlieb.. although the problems were simple, I didn't have any experience with Gottlieb games. Working on another brand of game always takes a while, you have to become familiar with the layout of everything (where do they hide fuses and relays under the playfield ?) and the general operation. In the end all this problem-solving and fixing took me 2 days. I did take my time, didn't want to rush things. I was a bit scared because of the things I had read about repairing Gottliebs, but in the end it was ok. If you know your boards are ok, 90% of the work is done..
Now everything on the game played as it should, I started to shop the game. All metal parts went into my tumbler and came out as new. They had to, as I had bought a NOS plastics set, I really wanted this machine to look as good as possible. The 4 drop targets were not original, so I replaced them by brand new white targets, on which I put new decals with the cubes image. I also put in new white bumper bodies and skirts, to replace the yellowed ones.
A final expensive problem was the sound board: sound worked but speech didn't. Luckily I had a spare board so I could test where the problem was. Unfortunately the rare SC01 IC was broken.. that chip is still available in the USA, but the price is $50 for one :-(
Last problem which I needed to fix was the playfield illumination.
None of the general illumination lamps worked !
I checked all fuses but they weren't broken, so I thought there would somewhere be
a wire loose ? Searched all over and under the playfield and connectors and couldn't
find anything wrong. Double-checked the fuses, looked in the manual to be sure
I was checking the correct fuse. In the end I took my dmm and measured voltage at the fuse.
Between the fuse and transformer: 6 volts. Between the fuse and playfield: 2 volts.
Weird ?! Finally I noticed the problem: although the fuse was not broken, it was not
a correct value ! Instead of 5A there was a 1/4A fuse which became very hot and
lowered the voltage. I put in a correct fuse and the game lit up.
Finally everything on this game worked as it should.
Click here to see the IPDB entry of this game.
If you're looking for pinball parts, then check out Pinballshop.nl (affiliate link).