
Shopping a pinball machine
7. Cabinet
Cleaning the playfield is only one part of shopping a pinball game. What use is a new playfield when the rest of the machine is still dirty ?
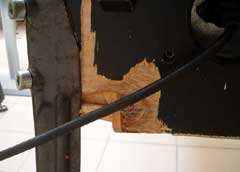
Repair damaged wood.
Use wood putty to fill holes and damaged corners.
It is easy to repaint the repaired part if it's in a solid color which is easy to match.
Clean legs or replace them.
As long as they are not completely rusted,
pinball legs can be cleaned and come out very nice. I use white Vim powder
with a scrubbing sponge, it gives excellent results. Chemical rust removers
also work well. Steel wool also works fine on most legs.
Black legs can be cleaned and repainted. Don't forget to paint the heads of the
bolts too.
It may sound like a small detail, but check if your pinball machine has the
right type of legs. Compare it to the picture on the flyer of the game.
Every brand of pinball manufacturer had his own style of pinball legs.
WPC games have different legs than older games.
Not every game uses chrome legs: some are black, grey, gold or even blue.
Some models of games even had extra short or extra long legs.
Finally check if the leg levelers are still in good condition. Sometimes they
rust (and can damage your floor) or break off. Or they're too rusty or dirty
so you can't adjust their height anymore.
Clean the outside of the cabinet.
If the game was out on location, it will be dirty and smell to cigarettes. Use a good cleaner on it and you'll be amazed how much dirt comes off. Be careful with older games (which don't have cabinet decals): first test that your cleaning product does not damage any paint.

Clean the inside of the cabinet.
At least vacuum it, this will already remove
a lot of the black dust and reduce any smell. A wet towel will also pick up most of the dust.
Some people that restore games also sand the inside so it shows clear wood again,
and spray-paint the edges next to the playfield like it was original.
Some restorers paint even the inside of the cabinet completely.
Same thing for the inside part of the backbox: on a lot of games it's plain black,
so you can spray paint it (use an airbrush or paint can, don't brush it on.. a small roller can also be used).
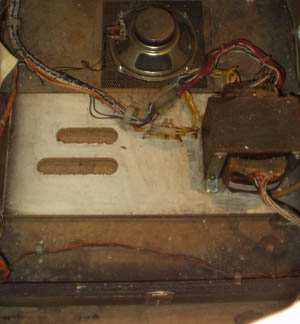
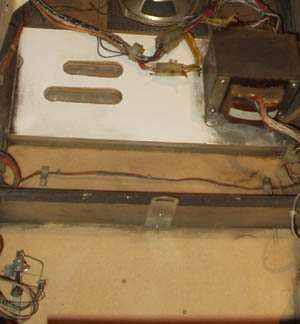
Left is the cabinet before any cleaning. Right is after sanding the bottom wood so it looks like new again.
In reality the difference is even much bigger than these pictures show !
Most games that have been on location will smell like cigarette smoke. If it still smells too hard after you vacuumed the inside and cleaned the outside, you can use chemicals to remove bad odors (e.g. Febreze). Stronger (industrial) odor removing products also exist, check a cleaning supplies dealer. Usually you spray it on the inside of the cabinet and wait a few days, and repeat if necessary.
Clean the dot matrix display and dot matrix panel.
Certainly if the game was out
on a location where a lot of people smoked, there will be a lot of dirt between
the clear plastic and the dot matrix display itself, which makes the display
look dim and faded. Remove the dmd and clean everything.

Don't forget flipper buttons, start button, plunger and coin door.
All have been touched by thousands of people. They need a good cleaning or replacement!
Disassemble the plunger, clean, re-assemble and use new springs if necessary
so it's powerful enough. Flipper buttons too, disassemble and clean.
Clean all metal parts in a tumbler, or manual with some chrome/metal polish.
On WPC games, clean the optos which get activated, as the plastic arm sometimes
is bent or broken.
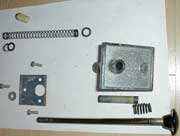
Replace or repaint the coin door.
A black coin door can be repainted,
a metal door can be polished. If the door is damaged (from a break-in, or just
bent from too many slam-tilts) then replace it. You can even repaint the coin door
while it's still in the game, but tape off the sides so you don't get overspray on
your cabinet. If you disassemble the door then don't forget to also repaint
the heads of the bolts which are used.
Painting heads of bolts is easy when you take a piece of wood and drill some holes into it. Put the bolts into the holes and then you can use a spraycan of paint. That way you don't have to worry about overspray and can let the bolts dry.
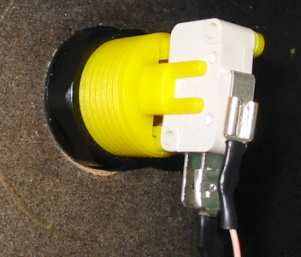
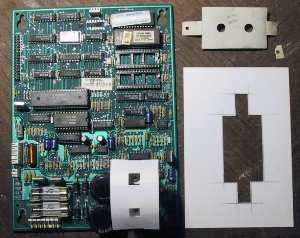
Start buttons and extra ball buttons usually have a light behind them.
Check if
it still works. This is one light bulb which most people forget to check !
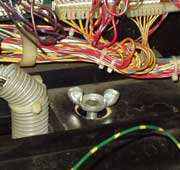
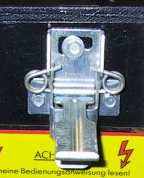
It's not difficult to replace it: the switch consists of 2 parts, the switch itself
is in a plastic housing (yellow in picture) which is secured into the cabinet with a
large plastic ring (black in picture). The light bulb and microswitches are in a separate
(white) housing which plugs into this button.
You can just pull this straight out and then have access to the light bulb.
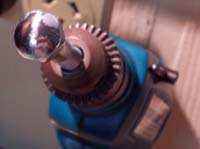
The start (or flipper) button itself you can remove by unscrewing the large plastic
hex screw from the inside of the cabinet.
Clean the translite or backglass.
Be careful when cleaning a backglass,
most types of paint can not stand any type of cleaning product or liquid !
The only thing you can do is use a soft brush. On older backglasses you can protect
it with clearcoat or triple thick (if that's available) to protect them from flaking.
If the paint is already flaking or has signs of cracks, then be very careful.
If you spray clearcoat/triple thick/varnish on a flaked backglass then take
care to do it from a high enough distance as the wind / force from the spray can
may even blow away chipped paint !
Sometimes it looks like there is water between the translite and the glass. There's not (unless something weird happened to the machine ??), these are just air bubbles. Clean the translite, the glass, and assemble again. If the plastic rails that hold the parts together are broken or damaged, put new ones on. Especially the bottom plastic rail is important as you need it to lift the backglass out of the machine.
Clean the playfield glass.
If it's too scratched, just replace it. Be sure to buy tempered glass !
Clean and adjust the lockdown bar.
Replace the 'beer seal' underneath it.
You can use weather stripping for this. If there's ever a liquid spilled on the
playfield glass (a glass that falls) then the liquid will be stopped and not flow down
onto the inside of the coin door (and gum up your service switches and coin validator,
cause a short or make everything sticky). Also clean the metal underneath
the lockdown bar as it's usually dirty. And if necessary, adjust the lockdown bar so
it's locked tight. There are 2 screws which you can use to adjust how it locks in place.
Clean the coin validator mechanism.
Usually it's dirty inside of all coins
which passed through it. If the game is set to free play you can replace the
denomination decals to indicate this.

Check service switches.
Sometimes they're sticky and don't work well.
Clean with contact-cleaner or replace them. If this doesn't work: WPC switches have 2 pins
for each switch. So measure with your dmm if the other pin still makes contact
(measure for continuity with the black wire and the opposite pin of where
the orange wire is connected to). If it does, then solder the orange wire to
this other pin. If not, replace the switch. Another option (dirty trick if you're
doing a repair): just cut the orange wire and manually short it against the
black wire or even against ground (the metal of the coin door) instead of pressing the button.
But be careful the stripped wire doesn't short anything while you're playing the game !
On WPC games the black (ground) wire needs to be wired correctly or the service
switches will not work btw ! As it goes first to the coin validator, sometimes
there it's cut and the switches will then not work either.
Also check the other wiring inside the cabinet, which e.g. goes to the tilt switches.
If it's cut somewhere this can cause other switches not to work or cause weird problems.
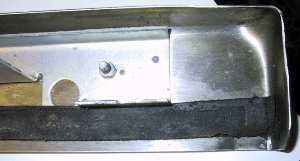
Check the metal plates into which the leg bolts go.
These leg bolts are sometimes damaged, replace them. If the part inside the
cabinet is damaged, you can also replace this, or put nuts on the inside
which hold the legs. Whatever you do, make sure that after a game is shopped
all legs are secured ! The legs should not move (that's dangerous during gameplay
and will also damage your cabinet) but the bolts should not be over-tightened either.
Clean or replace leg bolts.
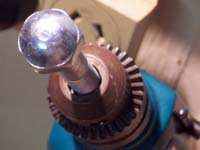
Tumblers don't work very well but there's a better trick for this (also suitable for long metal parts like a shooter rod). Secure one end in a drill and use a metal polish and steelwool while it rotates (wear gloves !!!). Leg bolts will shine as new.
The same trick (put it in a drill) can be used for ball shooter rods. Put the shooter rod in a drill, and use some polish and some sort of sponge in your hand (wear gloves !!) to remove all rust.
Check keys and locks.
Install locks if they're not present.
The key to the backbox should hang on the inside the coin door or in the cabinet.
Keep the game locked at all times (unless you work on it), even in your home.
Pets (like cats) love to get inside a cabinet, children can also reach in, ..
Don't forget there's lethal voltage inside !
Most parts dealers sell keyed-alike locks. So if you have a lot of games you can
install the same locks on all of them, so one key will open them all.
If you use different locks, hang a keychain (most promo plastics for a game
include a keychain) so you don't have to search long what key fits on what game.
Check the bolts and lock to secure the backbox.
Every game has bolts which secure the backbox to the cabinet.
If it's a type of game of which you can remove the backbox then usually 4 bolts are used.
Games with a backbox which folds down (WPC) require 2 bolts to secure
the head on location.
Do not only use the clip on the back of WPC games.
You don't want to know what happens to your siderails or playfield glass
when the head falls down during gameplay ! But make sure this clip is also present and use it !
A final minor detail on WPC games: check if the metal plate is on the
back of the machine where the wire leaves the cabinet.
This keeps the
wire in place so it cannot be unplugged from the machine when you pull the wire
(or someone trips over it).
Not a minor but very important and possibly lethal: check the wire and
the wall plug ! Make sure the wire is intact and not damaged anywhere.
Replace if necessary. Double check the plug is of the 3-prong type,
is wired up correctly and the ground pin is connected !
About the ground wire and plug: older games usually do not have this.
Although there's the Smitsonian principle of keeping old games original:
that's only for games which are on display. On games which are played by people
safety goes first !
So replace and upgrade the electric wires if necessary. There are dealers
who upgrade electro-mechanical games: they install a ground wire all over
the cabinet, install additional fuses, .. just to make sure the game is
upgraded to current specifications.
An upgrade which you should at least do to the very old games is install
a (new) power switch. Old games even didn't always have one, the game is
always on when plugged in and only switches off the lights.
Also check there's continuity between the ground wire in the backbox and the cabinet. When assembling the head back on a game the ground wire is often forgotten.
Also important: check the high voltage wires and boards inside the cabinet.
These run along one side of the cabinet, towards the power switch,
and then go to the transformer. Somewhere in between there's also one or
more fuses (check they're the correct type).
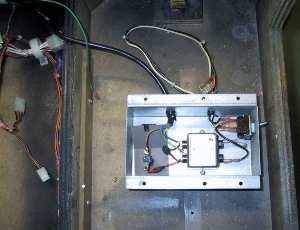
On WPC games the fuse and a few other components are inside a metal box.
This box is screwed to the cabinet so you cannot see or touch the inside.
On old Bally/Stern electronic games, there's a clear plastic piece above
the power board (which has fuses on it) so you cannot accidentaly touch
the high voltage components. Also check the condition of the wiring and
connectors. Sometimes global illumination (GI) wires will burn close
to the transformer, so if the lights are dim it's not only burnt connectors
on the pcb's you have to suspect.. Just do a visual inspection of all
wiring inside the cabinet to see it's still safe and not hacked.
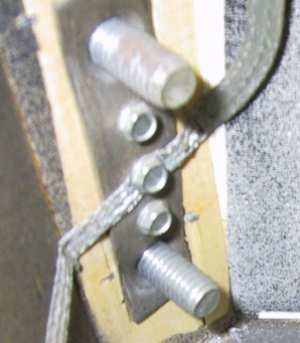
Some pcbs have cardboard parts on them to prevent people from touching the high voltage
or very hot parts. Check these are still present and replace if necessary.
As you can see you can cut out these parts yourself.
Install cabinet decals or repaint the cabinet.
Some people make templates and repaint the whole cabinet of older games.
For some popular recent games you can buy new decals. This usually is the
last finishing touch of a complete restoration.
The game will really look like new again now. But be sure it's really worth
the effort as it will take a long time and requires a lot of preparation.
It just depends how far you want to go to restore a game like new.
Most people buy a game to play it, so only shop the playfield, as that's what really
matters to gameplay. Others want the whole game to look like new.
There are two ways to apply decals - 'wet' or 'dry'. The wet method uses windex or soapy water underneath the decal so you can better position it in place. With the dry method you have to position it perfect from the first time. Before applying decals you have to fill holes, sand it smooth and maybe even varnish the cabinet. Even the tinyest imperfection has to be removed. Both ways are described on detail on Robert Winters website: dry method - wet method.
If you apply new decals, you probably also have to buy new siderails
(the metal parts which hold the playfield glass in place). On WPC machines
they're stuck to the cabinet with very strong double sided tape (and one or two bolts at the ends).
On recent games it is almost impossible to remove them without damage, or damaging your cabinet.
The best way is to use a knife to cut underneath the siderail as far as possible.
You can also use a hairdryer to soften to glue.
So if you want to replace decals, make sure you have a source for siderails..
If the cabinet is still very nice and the siderails are bent (because the
backbox fell down onto the cabinet), try to straighten them.
Removing siderails is a difficult task (without damaging the cabinet).
On older games siderails are usually nailed, but additionally have one or two screws
at the ends.
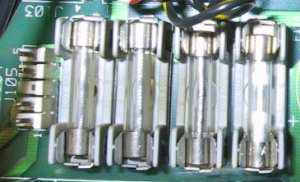
Check fuses
Not really cleaning-related but easy to do now when you're busy in the backbox
and which makes sure everything is ok: check all fuses.
Not only 'beep' them out to see they're not blown, but actually remove
them from the holder and make sure they are all of the correct type.
Also check their holders when you put them back in. Sometimes the metal clips are
broken and don't put enough tension on the fuse.
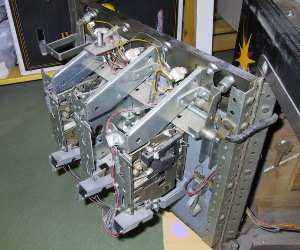
Check the boards of electronic games.
Make sure they're all screwed down and are not loose, as this can cause ground problems.
For most types of pinball machine there are upgrades documented which you can do
to make the games electronics more reliable.
Check for bad connectors and other bad repair jobs. There is no use replacing all light bulbs, when a GI connector is burnt and does not allow any current to pass. Replace the connector and if you know how to do it, also solder new pins on the PCB (or find someone to do it for you).
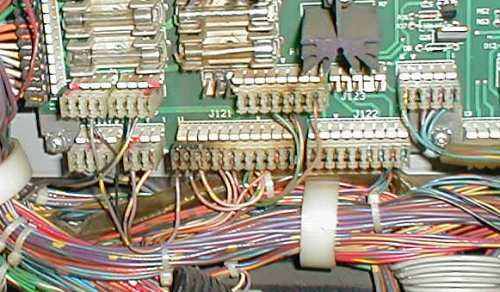
Something which doesn't take much time when you're working in the backbox,
is to check all connectors are tight enough. Dirt and smoke comes onto the metal
pins, and temperature differences make the connectors move a bit and finally
cause intermittent contacts.
So just give them a gentle push, to make sure they fit tight. The small movement you cause will clean the contacts.
Especially connectors of gray flatcables make a noise when you push them.
It doesn't take much time, but you'll be certain they make good contact
again for the next 10 years or so..
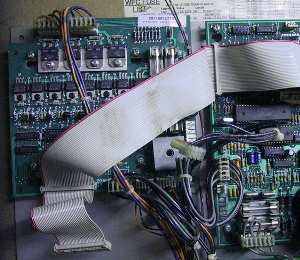
Speaking about these flatcables - when you removed them: always check they are correctly oriented. The red strip marks pin 1, which is labeled on the PCB. Be careful if you plug them back in as it's easy to offset them a row.
The first generation of electronic games will have more problems with corroded or burnt connectors than recent games. A good way to make the game more reliable for the future is to remove each board and reflow the solder on each pin. It doesn't take much time to do so and may solve a lot of problems. And with electro-mechanical games you really have to go with sandpaper over every pin of each connector to make them clean again.
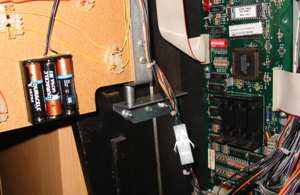
Check for battery damage and install a remote battery holder.
Remote battery holders are cheap insurance.
It doesn't take a lot of time to install one. If things go wrong and
batteries start to leak, you'll be happy you installed it.
If you sell the game, you can be sure that newbies to pinball do not know there
are batteries inside a game, or will forget to replace them even if you told them
to do so every year. So protect the game with a remote battery holder
or you can be sure that they'll kill the game somewhere in the future.
And you don't want to be responsible for a games death, after you have put
so much effort in it to make it look so nice.
Installing a battery holder is not that difficult. If you don't want to solder
onto the cpu board, then you can use a wood dowel the same size as a regular battery,
with a metal tack at the end to which you connect the wire. That way your solution is
really plug and play..
Games from the 90ies on use 3 regular AA batteries. You can just install a remote battery holder. Older games usually had a rechargeable battery. If you replace this with a remote battery holder, you have to hook up a blocking diode too so the game will not try to charge your non-rechargeable AA batteries.
Only check or change this if you are comfortable working with transformers and electricity
(and always be very careful - UNPLUG the game first !): check the transformer settings.
Older games have a 'high power'and 'low power' lug on the transformer.
More recent games also have settings for specific voltages, this is done by switching wires
on a plug (check the manual for specifics as it can change for each game).
This is meant so you can adjust the game
to local power conditions, as it will not always nicely give 110/120/220/230/240
or whatever volts are used in your area/country. This setting has an influence on
most voltages in the game: at the coils, light bulbs and even on pcbs it matters.
How you set this depends on the situation. Normally you adjust it so it's closest
set to the voltage in your house. e.g. if the voltage is close to 220 and the game
is set to 240, electronic games may reset sometimes as the watchdog circuit may activate
because the voltage drops below a certain level. If you have this problem then
you'll have to change the settings. On the other hand, if you have 230 or 235 and
the game is set to 220, coils may be too powerful, and other parts (light bulbs but
also all electronic components) may wear faster.
The only time it may be better to set the game for 'low power' while you have
a higher voltage coming in, is on electro-mechanical games. Then coils will become
a bit more powerful so the game plays faster (which some people like, especially if
you're used to fast modern machines).
Upgrade speakers
Not something which is included in a shop-job, but now we've taken everything apart it's the right time to do. Recent pinball machines usually have very cheap speakers installed. They are of a low quality, while the system itself (especially on Williams/Bally pinball machines) is capable of generating sounds of a much higher quality. Especially in home use you probably want to enjoy the sounds the best way possible. It's possible to buy a plug-in solution for this. On this site Tony explains how to upgrade the speakers yourself.
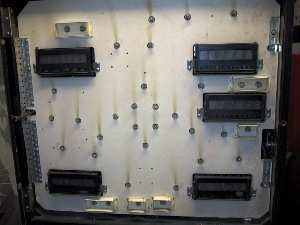
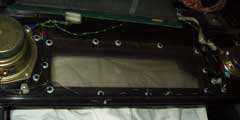
Don't forget to clean the backbox light board. Almost every game (except some
recent Gottlieb and Stern games which use one fluorescent tube) have a panel in which
the light bulbs are plugged in to illuminate the backglass. Check the broken light bulbs
and replace them if necessary. usually there are black markings above light bulbs because
they heated the panel, so clean or repaint the panel itself to give it a fresh look.
8. Finish
 OK, now you've done all this and assembled the game back together,
take a step back and admire your hard work. The game should look a lot better
than before and also play better.
OK, now you've done all this and assembled the game back together,
take a step back and admire your hard work. The game should look a lot better
than before and also play better.
Now it's time to play-test the game. Before you turn the game on, double check everything is in place, you didn't forget any connectors, or worse put them in the wrong position. Then switch on the game. Always an exciting moment.. everything should work but you never know... If something goes wrong (fuses blow, a coil activates from itself, ..) then turn off the game immediately and investigate the problem.
OK now the game is turned on. Best thing to do first is to run every self-test. Check that every coil activates and the assemblies move well (coil activates and plunger goes to its initial position afterwards). Test all switches by hand if necessary.
Don't forget to install new pinballs. Or at least check they're still in very good condition. We don't want scratched balls to destroy our nicely shopped playfield.
 Time to play !
I mean test-playing. Not just playing, but at the same time testing.
Don't just try to get a highscore. Pay attention to how the game works. Make every
shot on the game several times. Look out for everything which doesn't work like it should.
Switches which don't register. Coils or other assemblies which activate or don't
activate when they should or shouldn't.
It's always possible something needs a bit of adjusting. Also try to get a 'feel'
of the game. Are shots easy to make ? Does the ball go towards where you shoot it,
does it feel right ? The game may need to be leveled or flippers need adjusting.

Don't forget to level the game.
If everything works fine, we have to make sure
the game 'feels' fine. There are several ways to level a game. Most people use
a level (duh) to make sure that the back and front leg levelers are set.
You should level on the playfield, but a wide level will not fit, so either
put it on the lockdown bar, and to do the backside set it underneath the translite
or even on top of the backbox. But a playfield may not always be perfectly
even into the cabinet (most of the time it will tough).
Others will level a game on sight. First set it up until it looks right.
Hold a pinball at the back of the playfield in the middle and let it roll. It should
go nicely through the middle of the flippers. If it doesn't, your playfield isn't level.
And even if your game measures level, it is possible it doesn't 'feel' right
whilst you are playing it. So adjust the level, or make the angle of the playfield
more or less steep, until it feels right. While the manual of modern games says they should
be set up at an angle of 6.5 degrees, this is only an average and also depends
on your personal taste. It's your game, you set it the way you like to play it best.
Final step: clean the playfield glass again. You probably put fingerprints on it when you leveled the game.
Congratulations, your game is shopped. Enjoy it. It should work fine, look great and is fun to play. And continue to do so for a long time.