Shopping a pinball machine
0. Play and test the game
We have to know which problems exist before we can repair them. So play the game, also run its self-tests. Take note of everything that does not work as it should. Repair as much as possible.
In a perfect world, the game should have no technical problems at all when you start
to shop it. Shopping should only be cosmetic. And when you've finished shopping,
there also shouldn't be a problem. If there's something wrong, then you know it's
because of something you did.
If you start with a game with problems, or didn't test if there was something wrong,
you just don't know if any problems afterwards were already in the game or
because of something you did, which makes it more difficult to troubleshoot.
As we're not in an ideal world, and recent games have complicated playfields, it's not always possible to repair everything. Especially not if it's in a difficult to reach part. Or it's a waste of time to remove a part to fix it, put it back on, and later remove it again to clean it. But at least try to fix as many problems as possible, and note and investigate every other problem the game has so you can fix it when that part of the game is available. When you finished shopping a game and notice there is a problem, you have to be absolutely sure the problem already existed before or not.
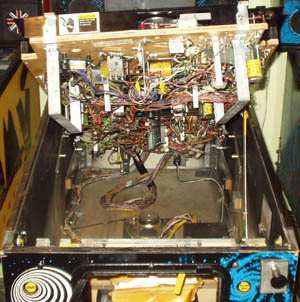
1. Remove parts from the playfield
I start a shop job by removing all parts from the playfield. For most beginners this seems an intimidating task. Remove everything on a playfield. You just don't know where to start, you're afraid you can't assemble everything back, .. But for a thorough cleaning you have no other choice. It has to be done. Every part has to be removed, cleaned and inspected.
 I leave the playfield inside the machine, but on WPC games it's usually fully extracted
so it's easy to reach parts at the back of the playfield.
I leave the playfield inside the machine, but on WPC games it's usually fully extracted
so it's easy to reach parts at the back of the playfield.
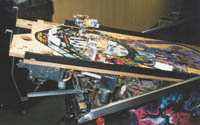
Some people find it easier to remove the playfield from the cabinet.
But then you have to disconnect a lot of connectors, and to lift it out
the cabinet you should be with 2 people. You also need enough room (a large table)
to put it on. And removing parts from the underside may be difficult then,
unless you have a 'playfield rotisserie'.
A playfield rotisserie is an ideal tool to have if you often shop a pinball machine.
You remove the playfield out of the game and put it in the rotisserie.
You can turn the playfield over, work on the top and bottom side, and you don't have to bend yourself
in weird positions to reach an assembly at the back of the bottom of the playfield..
This
website describes how to make a playfield rotisserie yourself.
As my games are next to each other, I will pull it half out of the row. That way I can work comfortable from both sides of the game without having to squeeze myself between 2 games. There will always be parts that can better be reached from either the left side or the right side. Try to make it as easy as possible for yourself.
If you leave the playfield in the game, put an old blanket or sheet on the bottom of the cabinet. Parts that come loose and fall down are then easy to find and can't get lost because they roll somewhere in a corner or underneath a the raised wood that holds the transformer. On solid state games this is not always necessary (half of the screws usually stick to the magnet of the large cabinet speaker) and parts can be found with a little bit of searching. But on electro-mechanical games there are just too many important parts on the bottom side of the cabinet ! So always cover these, so you don't create a short or other problem when something falls down and you can't find it ! Make sure you find all screws back which fall down. If you've raised the playfield completely then it's always possible a screw falls and doesn't make it to the bottom of the game but is stuck somewhere on another part of the playfield. Search until you find this, as it can create a short (and you shouldn't assemble a game with missing screws).
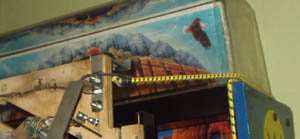
 A note on lifting the playfield up: most games only have a support rod at
only one side of the playfield. Try not to use it, certainly for a long time !
A note on lifting the playfield up: most games only have a support rod at
only one side of the playfield. Try not to use it, certainly for a long time !
It should only be used to temporary raise the playfield when inspecting it
or making a small repair on location. Because it only supports the playfield
on one side, the weight of all assemblies will bend the wood. Just lift the playfield
on the support rod and you'll notice the unsupported side bends down much further.
For a short time this doesn't matter, but if you leave it like this for a long time
(overnight or for multiple days) it can warp your playfield permanently !
The rod is also not very safe, you don't want the playfield to fall down
whilst your head is underneath it..
So if you have to work on the bottom side of the playfield, just rotate it totally
up so it rests against the backbox. If that's too high because you have to work
near the flippers, then take a piece of wood and use that to support the playfield
in the middle (somewhere near the ball trough there's usually room for a piece of wood).
Use the side support rod only when you have to, and don't leave the playfield in this
position for a long period.
The wide-body Sys80 Gottlieb games e.g. have a better support rod which holds the playfield from both sides. But most electro-mechanical, and electronic games by Stern, Bally and Williams only have one rod.
 The most safe way is to just lift the playfield completely vertical and secure it with a strap
to the head. That way it can't fall down on your head while you're working on it.
The most safe way is to just lift the playfield completely vertical and secure it with a strap
to the head. That way it can't fall down on your head while you're working on it.
If you want to save time, use an electric screwdriver. But it's best to only use it for disassembly. Assemble parts by hand, as not everything has to be screwed in very hard. Especially plastics are quite loose, only finger-tight so they can still move a bit to prevent damage if a pinball hits them. If you use an electric drill for assembly it is easy to over-tighten parts or break plastics because there's too much stress on them.
 When I bought
my Funhouse it was already shopped. However, most of the white starposts are damaged
at the bottom, some are even split over their full length.
Probably this is because the previous owner used an electric drill, which applied
too much pressure.
When I bought
my Funhouse it was already shopped. However, most of the white starposts are damaged
at the bottom, some are even split over their full length.
Probably this is because the previous owner used an electric drill, which applied
too much pressure.
Always use the correct tool for the job ! If you don't want to do
everything by hand, only use an electric screwdriver that stops when it feels some resistance.
Don't use your power drill !
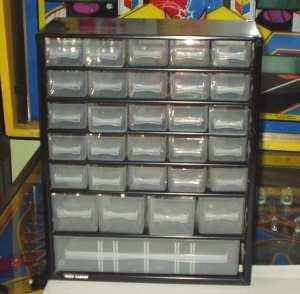 I remove each assembly at a time and put the screws separate.
I use a box with a lot of drawers. Some people use zip-lock bags.
Just put all the parts together which belong to one assembly with a paper
on which you note what the parts belong to.
If you assemble the game again it's easy: reverse order from disassembly,
and you know all screws you have were from one assembly. So less chance to
forget or loose a screw or use a wrong type.
I remove each assembly at a time and put the screws separate.
I use a box with a lot of drawers. Some people use zip-lock bags.
Just put all the parts together which belong to one assembly with a paper
on which you note what the parts belong to.
If you assemble the game again it's easy: reverse order from disassembly,
and you know all screws you have were from one assembly. So less chance to
forget or loose a screw or use a wrong type.
Only if e.g. you use a tumbler then it can be more difficult as all screws
and posts are mixed, so you have to search every time what parts to use now.
Tip: if you don't know where long or short posts were used, check with the
plastic which goes over them and see where there are holes in it.
Some people don't put everything in small bags, but take a large piece
of cardboard and just plug everything in that, similar to the position where
it has on the playfield.
Reasons why I don't to this:
- I have 5 cats that like to play with loose things
- Shopping a pin takes up more space
- On modern games with lots of ramps it can be difficult to pin things in the correct location on the cardboard, I find this cardboard-trick only good to locate posts and nothing else (very large assemblies or things with small screws).
- You can't clean all parts at the same time then, you have to remove something, clean it, put it back in place, then take the next part, ..
But depending on your situation it can be useful, especially if you don't have a digital camera.
Make a lot of pictures if you have a digital camera.
I make pictures from the
assembly when it's on the game. Then a picture from the parts (in position to
each other) when they're removed. If you don't have a digital camera, take a lot of notes.
Especially pay attention to where short and long screws are used.
But if you have a camera: use it ! Take a lot of pictures. And then take some extra from
different angles. You never have too many pictures. Also make some overview pictures.
I notice that I only make detailed pictures of the parts I remove, but never make
an overview of the playfield before or whilst I'm disassembling everything.
Some people use a video camera on a tripod. Just use whatever is available to you.
But make sure you document everything you remove.
What some people do - if it's the first time you will try to shop a game or
if you don't have a digital camera - is not to strip the whole playfield completely, but work in parts.
Remove one part of the playfield, clean everything you have access to, and assemble it.
Then move on to the next part. Especially if you are new to shopping a pinball
machine this is a good way to start. On some games you may not be able to reach everything,
but at least you can clean a lot. This is not a full shop job but just some cleaning.
But it's a lot better then doing nothing. And starting this way you'll become more
confident, a complete playfield strip is only a small step then.
As I don't have quick access to my computer, I can't rely on photographs alone to assemble
a game back together. It just takes me too much time to double check everything on my desktop computer.
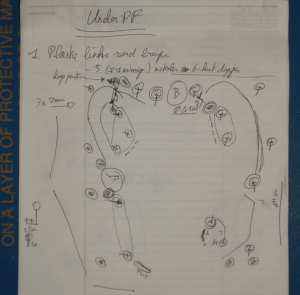
Therefor I now draw a diagram of the playfield when I remove parts.
This drawing indicates where posts are, what type they are (starpost or round metal), if they take a screw
that's flat on top or one that can have a plastic mounted, and where rubber rings go.
This one page will already answer a lot of my questions.
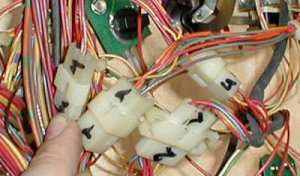 Label every connector you unplug.
Write numbers, letters, stripes, dots,
on them, attach labels, whatever you do: make sure you know exactly where you
unplugged something. Not only will it save time, but you are sure you put the
game back like it was before.
So if a problem occurs, you are sure it is not because you plugged something in a
wrong position. Or, what's also important: if you see an empty connector which is not
marked, it means nothing was plugged in to it. Because most games do have somewhere
a connector which is not used (e.g. because a certain feature the prototypes had
was cancelled during the production run).
It's the only way to be sure you didn't put anything in a wrong position during assembly
and introduced new problems.
The most difficult part is usually to know where to start.
Some pins are so
complex that it looks like everything is connected to each other and nothing can
be removed on its own.
Some games are indeed very complicated or screws are
very difficult to reach (esp. on Data East, Williams/Bally is on average a bit easier)
and sometimes you need to unscrew several things at the same time.
I usually start at the slingshots. If there's a ramp which is connected to it then
I start with that. If not, it's usually an easy game and I work clockwise
or counter-clockwise. If there are ramps on the game, do these first, as they
usually block access to all the other parts underneath it.
You'll notice that on most games once the large ramps which cross over the playfield
are gone, you can do the other parts on the playfield one by one without any
problem, and a 'difficult' playfield falls apart in a lot of easy parts.
Also take a look at the manual, as for some games with special assemblies
(e.g. mini playfields on Twilight Zone and The Shadow) it explains how to remove them
and what part has to go first.
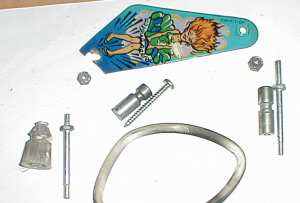
How many parts you remove depends on what you intend to do with the playfield.
If you want to have it clearcoated, then you have no option but to really
remove everything, up to every last post and metal wire.
Most of the time however this is not necessary. Small metal parts and posts which
are hammered in the playfield, can be left on. You can clean the playfield around it.
Only be careful if you use an orbital buffer.
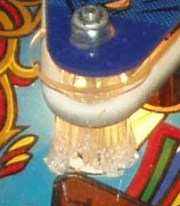
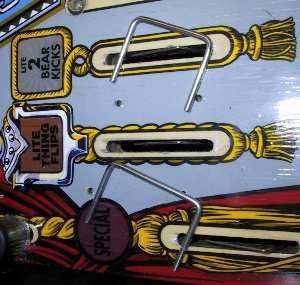
Pop bumpers are a bit tricky to remove. The socket for the light bulb in it has
long metal wires that are soldered underneath the playfield.
So if you can't solder, do not remove pop bumpers. If you do remove them, don't loose the small spring
underneath the body.
If you're new to shopping pinballs then it's usually easier
to leave the bumper body on the game and clean around it. Only if the bumper skirt
is chipped you have to replace it, as it can cause ball hang-ups.
Detailed instructions on removing pop bumpers can be found on this page.
Also remove every light bulb from the top of the playfield.
Some people replace them all by new ones. I don't, I just clean and test them
with a 9v battery. I replace broken ones and bulbs that have a dark/silver top as
these generate more heat. But used light bulbs which look good I still reuse.
You can put new light bulbs on the playfield and re-use the old ones in
the backbox, as it's easy to replace these when they're broken.
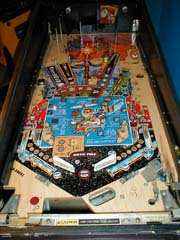
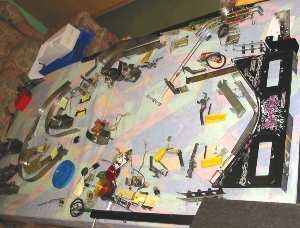
If you're done the playfield should look something like this: (almost) totally empty.