
Photographing pinball backglasses
Pinball machine backglasses can be very easy or extremely difficult to photograph.
The easy part is they're flat, two-dimensional. You almost can't make many mistakes with focussing and getting them
not sharp (I hope). They're square, so getting a good composition is also easy if you take care of it.
The biggest problem when taking pictures of a backglass is illuminating it well and reducing glare and reflections.
So depending on the surroundings (which you can't always control) they can be tricky to photograph..
First some theory. Glass reflects. Not a lot you can change about that, except using a polarizing filter,
but that's also not a magical solution. You can however change your position and change what and how much is being reflected.
When will you see reflections ? When something in the background is lit.
So when you shoot in a totally dark gameroom, wear black clothes and use a black camera, you'll see almost no reflections
as there just aren't objects to reflect.
On the other hand, if you wear a white sweater and stand underneath a light source, you'll show up very well
as you can see in the next picture.
So always take into account what's around you, especially if it has light falling on it.
It may not show up well in the viewfinder of your camera, but will definitely show up once you see the pictures..
Now you know why photographers should wear black clothes only..
Even the color of your camera can make a difference. A black camera won't reflect (much), but a
white or silver will, and you probably also won't like closeup backglass pictures taken with a funky purple or bright blue
compact camera..
If you do have one of these cameras, don't worry, there is a solution: take a piece of black
papier or cardboard. Make a hole in it, just large enough to stick the lens through. The bright color of the camera
is are hidden and cannot reflect an image on the glass.
Make the paper or cardboard large enough, so your own hands and face are hidden too. This is especially important when
taking close-ups from backglasses.
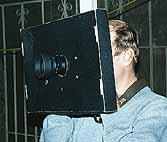
Small black reflection shield, ideal for taking closeup detail pictures of pinball backglasses.
Picture by Marco Rossignoli.
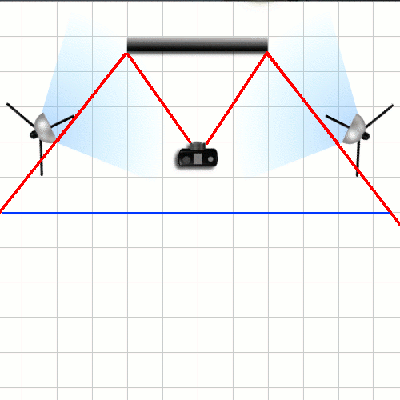
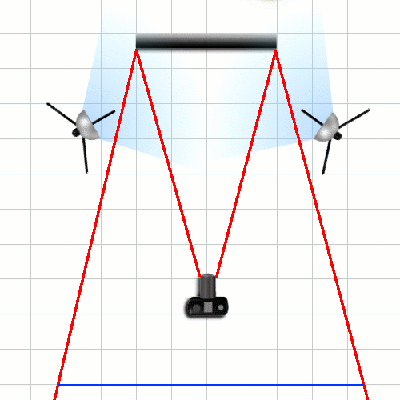
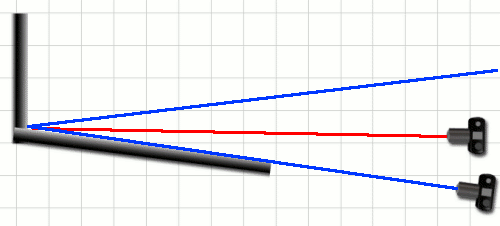
Take a good look at both light setups above. They show the difference between shooting a backglass with a zoom/tele lens,
and with a wide-angle lens.
The wide angle lens will allow you to be much closer against the backglass. This is how
most people usually take pictures - they zoom out as much as their camera allows, stand close to the backglass
and take a picture.
The outside red lines show the border of what's being reflected. Every object that's lit in the background in the area between the red lines (illustrated as a blue line) can show up as reflections in the backglass. As you can see, the blue line is much smaller when zooming in. The further away the camera is, the smaller the angle of what can be reflected.
Direct lightsources (hard light) are even worse to work with, they will show up as white spots in your picture.
If you need to add additional light, do it from such angles that don't reflect back to the camera.
It's easy to check - light travels in a straight line. Imagine you're playing pool.
If from the camera position you can hit the light source when bouncing off the backglass, the lightsource
will show up in the picture. Move the lightsource more to the side (or closer towards the backglass)
until it doesn't reflect straight back to the camera. If you can't move lightsources, try to move the camera.
So, here are my tips and tricks regarding photographing backglasses.
Turn off internal flash.
Turn off the internal flash of your camera ! It will reflect directly back at you and cause an ugly white spot on the backglass. It is just impossible to take a good centered backglass picture using on-camera flash.
Use a tripod.
Actually this is not only for backglasses but for every picture you make. Always use a tripod if you can. Your pictures will be better because you are stable. But especially for backglasses in a dark environment it's difficult to take good pictures without a tripod, because handheld pictures will be unsharp because of camera movement from the long shutter time..
Move backwards and zoom in.
Usually it's better to take a few steps back and to zoom in on the backglass, than to be very close and shoot it wide-angle.
As explained in the light setups above, that way you minimize the angle of what's reflected from the background.
Your own reflection will become smaller, and the overall picture looks more natural.
Extreme wideangle zoom lenses distort the image a lot. Everyone will have seen the results when you take pictures
with a fish-eye lens: the center of a picture looks round but everything on the border is distorted into a circle.
Normal lenses don't have this problem as much, but even at 28mm or 35mm it is still a bit noticeable.
Something square (like a backglass) will be wider at the center than at its corners.
Don't exaggerate and only use a 400mm telelens from the other side of a show hall (although if your camera has a
good quality objective and you use a tripod, you can try this).
If you want to use a photograph as a source to make a reproduction, also go back as far as you can, the result will
be closer to when it's scanned in. A reproduction from a wide-angle closeup picture will not be perfectly equal to the original.
At least try to take a few steps back and see if you like the result more. Don't sit with your camera very close
to the backglass, it's guaranteed to give you the worst possible result in most conditions.
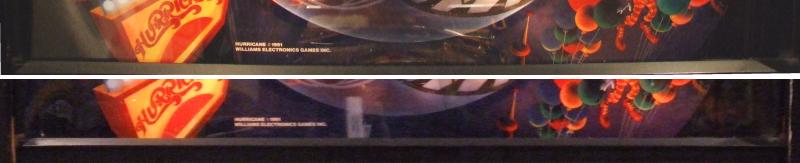
Top picture is taken at 28mm wideangle (so very close). You notice there is distortion at the bottom
of the backglass - the plastic trim is smaller in the middle then it is at the corners.
Bottom is zoomed in at 200mm, camera is about 4 meters (13 feet) away from the backglass.
Bottom plastic is straight, there's no visible distortion.
Cover the playfield.
Put something over the playfield (a dark sheet, a large piece of cardboard, ..) so you don't see the playfield lights. They can cause reflections or glare.
Use a reflection shield
This is the most important tool to use when you want to take professional quality like pictures of backglasses: a black (or dark) sheet, with a small hole in it. Tape it to the ceiling. Have someone stand next to you and hold it up. Whatever needs to be done. Unless you work in a dark room, you will get reflections and this is the only way to prevent them.
Cut a hole in the sheet, just large enough for your camera lens. You won't see any unwanted reflections in glass anymore.
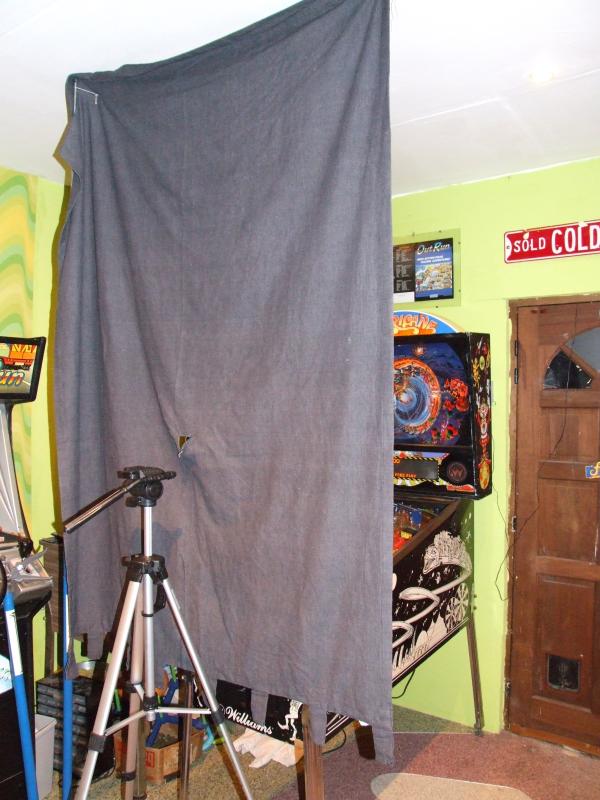
A dark cloth with a hole in it to stick the lens of my camera through. On location I take this with me.
At someone's home I ask the owner to stand behind me and hold it up in the air, or you can just put it over your
head and hide behind it, to remove your own reflection.
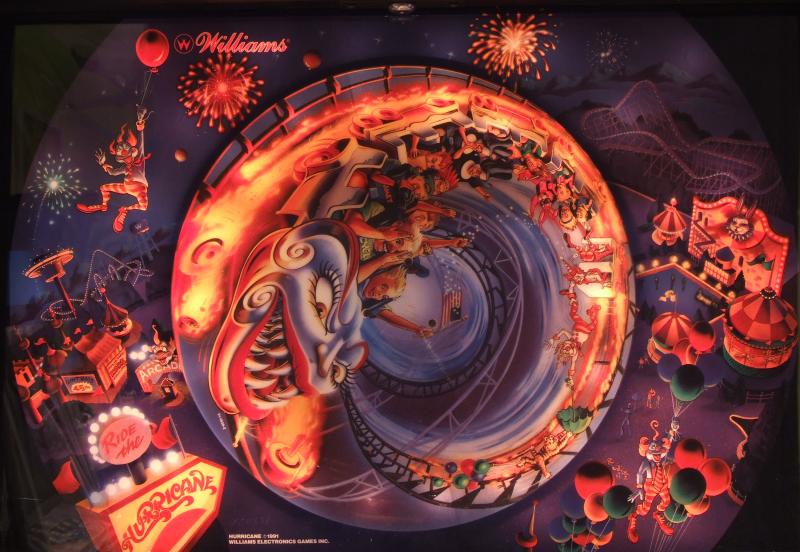
This picture is taken with the setup above. NO reflections at all ! You can't see there is glass in front of the translite.
When taking closeup pictures or when you're in a dark environment, a small reflection shield as seen at the top of this page can be enough and is easier to use.
Backglass composition.
There are a few rules to keep in mind when taking pictures of backglasses. They're not difficult, but thinking about them will make your backglass pictures look better and more useable.
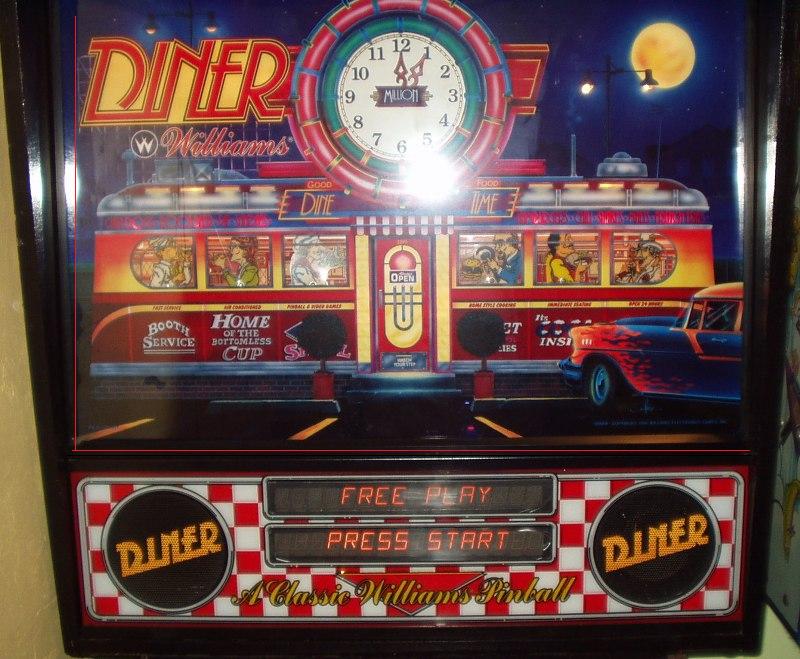
1. Include the whole backglass.
Sounds obvious but it's not something you always remember.
See picture above: top of the Diner translite is cut off.
2. Horizontal is horizontal.
Keep the camera horizontal to bottom of the backglass. You could rotate it in Photoshop but we want to get it
good from within the camera.. You really don't want to come home from a pinball show with 250 pictures and decide
for each of them if it need to be rotated 2,45 or 2,65 degrees to be perfectly horizontal.
3. Keep the camera perpendicular to the center of the backglass.
The lens and backglass should be on parallel planes. The camera should be in the center of the backglass.
Either use a tripod, or go down a bit through your knees and tilt the camera if you have to.
That way you don't get any perspective distortion.
See the red lines I have added in the photo of the Diner backglass ? The bottom of the Diner translite is almost horizontal,
the camera was around the center (as indicated by the white flash reflection),
but the camera was tilted. This makes the backglass wider at the top than at the bottom.
A small tilt like this can be corrected in Photoshop, how good the result will look like will depend on
the resolution of the picture and how large the angle is. But again you just don't want to do this type of
postprocessing to a lot
of pictures.
Almost straight out of the camera like this, only needed to be cropped a little.
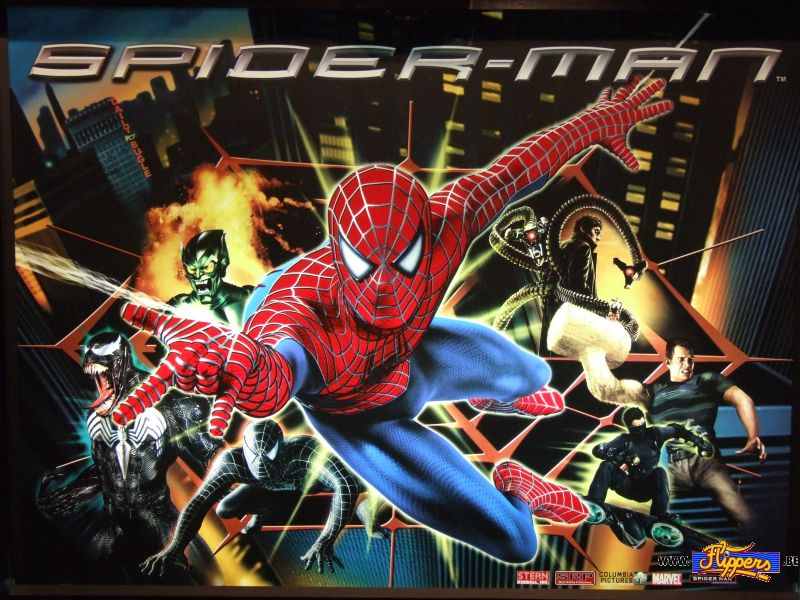
Check my pinball desktop wallpapers webpage. All backglass pictures there, of the Wheel of Fortune, Spiderman and Family Guy backglass were all taken this way. Handheld, camera perpendicular and centered, .. No flash, in a pretty dark gameroom. The pictures almost came out like that out of the camera, I only had to crop a little bit at the border but didn't need to rotate or change the perspective any way.
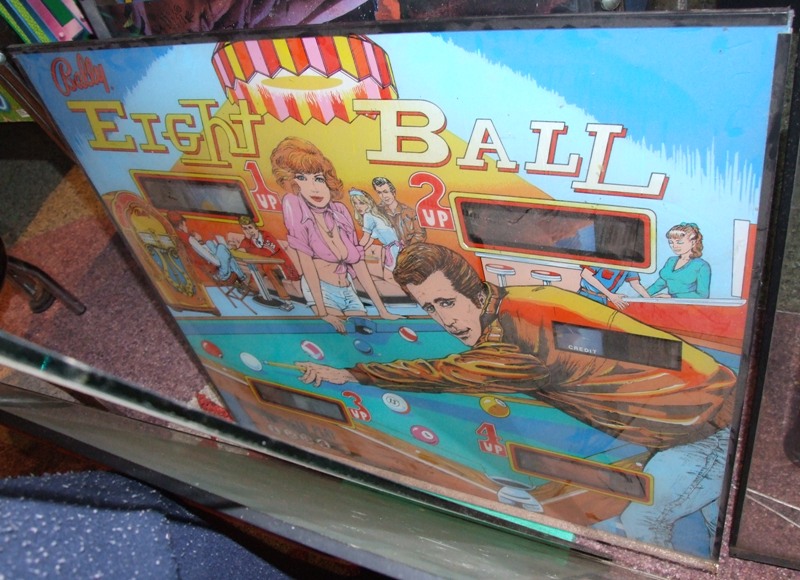
This is what you don't want.. a picture like this is good to show a seller there is a backglass, with no
major flaking (and even then he may not be impressed).. but nothing else useful can be done with it.
Lighting a backglass
How you will light a backglass will depend on what you need the picture for.
If you want to show the artwork then you want to light it very bright, usually from the front.
If you want the show the atmosphere of the pinball machine, then you want to use the lights
of the pinball machine itself and maybe add a bit of extra light to bring out more detail.
This usually gives the best results.
Back-lit backglasses
Important is to level ambient light with light from within the backbox, so you get the picture you want.
Only you can decide how much light is enough. Do you want to see every detail in the backglass or
are some darker parts still allowed ?
Each backglass is different of colors and illumination, so what works for one game may not work for another.
Start in a dark room
There is also a large difference between translites and real backglasses.
Most translites are pretty easy to photograph: start in a dark environment, put your camera on a tripod and
let the camera take a picture on auto settings. Check how good it looks, and experiment with adjusting
exposure time to make the picture overall less or more bright.
If the longer exposure blows highlights
(the places lit from the back by the lamps lose details and show up in the picture as white spots)
and you want to show more detail of the artwork, then add ambient light from the front to show more details in the artwork.
The Space Shuttle backglass below for example is not as well lit at the borders. It's in my opinion a nice photo to illustrate how nice the backglass is. But it would not be useful as a source to reproduce the translite.

Tip: cover the DMD (or alphanumeric scoredisplays if they are separate) or zoom enough so they are not in the picture. Gas-discharge displays are very bright in comparison to a backglass and may confuse your camera. This can result in an incorrect whitebalance or the backglass being underexposed (too dark). But also experiment with the dmd in view while focussing, maybe you'll like the result..
Remove translite from game
There is one easy way to have a translite evenly lit (so you can use it as a source to reproduce it).
Take the translite out of the game. Stick it to a window on a sunny (overcast) day
and it will be evenly lit from behind, showing all the artwork nicely. Try not to put it in strong direct
sunlight, as most translites also have some kind of mask on the back which can cause high contrast.
If necessary add some ambient light.. but usually you don't have to.
This is something everyone can do at home. Even with 'real' backglasses you may get great results using this simple setup. Colors will be great as the translight is lit by the sun.
Photographing 'real' glass backglasses is more difficult than translites. Most of them have a silver mask on the back
of the artwork, which blocks a lot of light. Only a few specific spots will allow light to shine through them,
ie the 'Game Over' window or whose turn it is, ..
So forget the 'start in a dark gameroom' trick I mentioned above. Most of the artwork can only be seen well when the glass
is also illuminated from the front. In a dark room the contrast is too big, lit areas will show up bright and the rest
will be dark. You can only get good photographs that show the artwork of backglasses well if there is enough ambient light
(check your histogram).
Front lit
If you need to add light, look at the light setup schemes at the top of this page. Always add additional lights in a position so they don't reflect back to the camera.
Balancing light is most important. A bright light from one side will make things unevenly lit. So if you can, add a second light (same color and brightness) at the same position opposite to the first light. If you only have one lightsource, you can use a reflector (a white piece of cardboard, foam, a sheet), on the other side to bounce light.
As on most types of games the backbox sticks out in front of the backglass, you also have to take care about shadows. If your additional lights (especially when using an external flash) are too much to the side, and too bright in comparison to the ambient lighting in the room, they can throw a shadow onto the backglass. Therefor you need a light (or a reflector) from the other side as this will help reduce the shadow.
Also important as you can see in the picture above: don't forget to remove the keys from the backbox lock !
Use a polarizing filter.
If your camera can have one, use it when taking pictures of backglasses !
A polarizing filter is created to filter indirect light. Some reflections of objects in the background can
be prevented with it. However it's not a magic solution. Polarizer filters work best if the light comes from an
angle towards the camera. It will almost have no influence if you want to get rid of reflections that come
from object behind the camera.
Mirrored backglasses
Backglasses of older pinball machines often have a mirrored artwork. These backglasses actually are made out of mirrors where the reflective layer was partially removed so artwork could be printed on them. A mirror will reflect anything.
The only way to make good pictures of a mirrored backglasses is to use a reflection cover. The large black sheet
I mentioned above.
That way you control totally what is positioned inside the reflected area - a dark sheet..
People may laugh at you or give you weird looks when you take pictures like this at a pinball show, but at least
you'll get good quality pictures.
Usually a black sheet will get you best results, but depending on the environment a white sheet can work too.
It'll depend on the backglass itself, which colors are used, how large the mirrored area is, ..
but will especially depend on how the room is lit.
A white cloth has the advantage that you can light it from behind. Only make sure to evenly light it
so you don't get any hotspots, or shadows from the camera or photographer himself..
In a reasonable dark room you can better use a dark backdrop.
You'll usually get best results using black. Only if you are in a very bright environment
the black can contrast too much and you may need white.
Exceptions
Using flash
So you're visiting an operators dark warehouse, you can barely see anything, forget about controlling or adding any light, and suddenly you notice a rare backglass that you absolutely need to take a good picture off. All you have is a point-and-shoot camera that you always keep in your pocket. What to do ?
The only solution is to use the camera flash, but to make sure it does not reflect back towards the lens. So you have to forget what I said above about not using flash and to be centered..
One trick is to position the camera low enough so the flash is not reflected back on the backglass towards the camera.
You will need to zoom in a lot, stand way back, and be lower than the cabinet itself. Follow the slope of the playfield glass
and position your camera a bit underneath it.
As on almost every camera the flash is situated at the top above the objective, it may help to turn the camera upside down.
You will need to experiment a bit to find the correct distance. Too close and the flash will throw a shadow from the front cabinet part onto the backglass, or still show up. Too far away and the flash has almost no effect. On dslr cameras you may have to manually adjust exposure time, on compact cameras try different built in modes, portrait may give you good results.
Sample image of setup mentioned above, taken in a dark room. You should zoom in so only the backglass
is in view.
As you can see, most of the flash bounces off the front cabinet.
Note the flash also reflected off the backbox lock.. a little piece of dark tape can prevent this.
If the picture is underexposed then brighten it up later in a graphics program. Some cameras already have a
setting to overexpose a picture a bit.
Reflections become more obvious in a bright environment. Sometimes it's better to deliberately underexpose
a picture to reduce reflections, and brighten colors a bit in postprocessing.
Another trick is to take a picture with a wide-angle, standing next to the game. You will also not get reflections, but the backglass will also be smaller and have perspective distortion.
Take multiple exposures
One solution to make nice pictures of backglasses that have a lot of contrast, is to take multiple photos at
different exposures, and to merge them later in an editing program. It'll take time in postprocessing, but in
some circumstances you don't have any other choice if you want to show every detail.
One example will be backglasses of electronic games from 1977 to around 1985. They have windows in which
you see the electronic score displays. These are very bright. When you want to take a good picture of them in
a dark gameroom and can't (or don't want to) add ambient light, take multiple pictures.
What you need is a good tripod and a camera that allows you to change exposure (or you try changing composition so
one time displays and one time the rest is in the center point).
Take one picture with the backglass art itself well exposed. Lit score displays will be too bright.
Take another photo with score displays well exposed (the rest of the backglass will be too dark).
Later you merge these pictures, take the best parts of both. This can be a simple cut and paste,
but you'll probably get nicer effects if your photo editing program lets you open both images in different layers
and then you use dodge and burn tools to merge the parts you want.
Some cameras have a setting that will take multiple exposures, one with correct exposure, one under- and one overexposed. Experiment with this too (always set your camera on a tripod !).