
Pinball photography 101
Pinball machines are beautiful objects. Bright lights and colors, reflections and shadows, special artwork with lots of details that look great when viewed in closeup: pinball machines and especially their playfields and backglasses are good subjects to make photographs off. Or even drawings or paintings, as a lot of people will probably already have seen the paintings by Charles Bell.
Most people that are interested in pinball machines look in amazement to these works of fine art, or the nice photographs by Kevin Tiell and think they could never create anything like that themselves and you need a very expensive setup for this.
This is only partially true. You do need some knowledge about how to take a photograph (more than just aim and press the button). Having good photoshop skills may also help a lot if you want to create spectacular artwork. A more expensive camera will give you better looking restuls, but even with a normal point-and-shoot camera you are able to take quality pinball pictures that you can be proud off and that won't look bad framed at the walls of your gameroom ! OK for some special shots you'll need something special like a wide-angle or macro lens, but it's not that because you only have a point-and-shoot camera, you cannot take any great looking pictures at all !
Even if you're not interested in the artistic part of pinball, good pictures will help you when selling a game on ebay. Especially if it's really in such mint condition as you say and don't want to hide anything. Paying a bit of attention and taking good photographs can mean you get more money when you sell the pinball machine. Or if you don't auction it and put it just for sale, can it result in finding a buyer much faster.
My first introduction to pinball photography was about 8 years ago.
I was contacted by Marco Rossignoli when he needed pictures of my Road Kings pinball machine for his book
Pinball Memories he was working on. Some of the tricks I'll show here I learned from him.
Since then I've taken a lot of pictures myself. As I always try to use my own pictures on this website,
each time I visit pinball shows I make a lot of pictures of every machine present, in case I ever need it for an article..
At Pinball Expo 2002 there has also been a seminar about pinball photography.
I have been planning for a long time to write an article about photographing pinball machines.
I'm busy with photography itself for about a year now, still learning more and more every day, always trying to make
better pictures than before as I'm a bit of a perfectionist. Problem is that each time I learn more, my expectations
go up, so I probably won't be happy until I make pictures that look better than what's technically possible with my current camera..
And if I invest in a better camera it'll probably take me another year until I find I know it well enough and pictures
are good enough..
So now I just decided to start writing an article about pinball photography for my website and included what
I already learned. If I wait until I'm happy with what I know and think I mastered it, it'll be probably
another few years before I write this tutorial..
I also didn't know what angle to take - there are a lot of things to talk about in pinball photography.
I don't want to include too many technical information about photography itself, but some basic knowledge is required
and I'll include links to websites that explain it more in detail, for those who are interested in learning
more about photography.
I didn't know how to present the material, I first wanted to show you nice pictures and explain how
they were done, but when I started searching through the thousands of pinball machine photographs I've taken over
the past year, I found many more examples of what not to do, then pictures that I'm really happy with..
and if I show too many pictures that are good, a lot of people may again think they'll never be able to do
something like that themselves and not try..
So I started writing this tutorial by showing you what basic mistakes I have made in the past (and often still make).
You will learn from my mistakes. My goal is to motivate some people to try and make nice pictures themselves.
Get rid of the 'I could never do this myself' thinking.
This is pinball photography 101. You will learn the basics that will allow you to make better 'snapshots'
of your pinball machine, especially if you want to make pictures to put on your website or if you want to
sell a game on ebay and present it as good as possible.
Maybe I'll make a sequel to this guide, explaining more in detail how to make 'fine art' photographs of
pinball machines, but at the moment I have no idea if and when this will be finished.
It'll probably also depend on reactions I get on this tutorial.
I don't know everything there is about photography (especially combined with pinball machines), and there may be
other ways to make great pictures. So if you had good results using another 'trick', or have questions or doubts
about something I say here, feel free to email me..
Note too there are a lot of things that can be corrected in Photoshop. But I want to be a better photographer,
not a better graphic artist, and it's usually less time and is more fun to do it correct using the camera,
than spending hours behind the computer later trying to patch things in postprocessing..
Where you photograph a pinball machine also has a large influence on what your possibilities are and
what results you can get.
If you are at home and its your own machine, you have much more possibilities to get the picture just right.
If you are taking pictures at a pinball show, a distributor, there is less you can influence so you just have
to make the best out of the situation.. sometimes you can't make great pictures, but at least you can try to make
the worst a bit better.. As I don't know in what situation you are, I'll try to explain all situations,
and just try to apply what's possible.
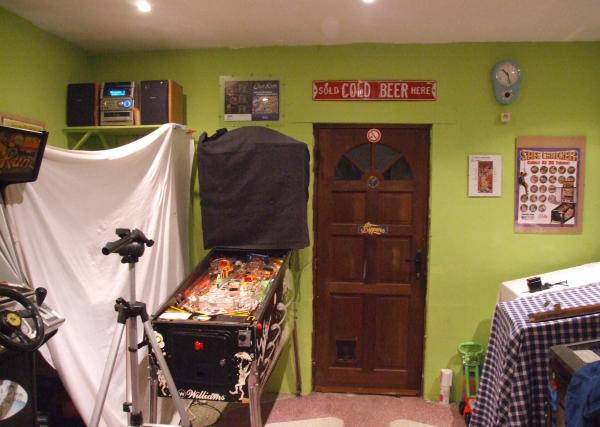
My photo-studio at home setup. A white sheet hangs next to the game, acts as a diffuser, and as a background for playfield
shots in that direction. Behind the sheet there's a flash that I can aim directly towards it, or up to bounce off from the ceiling.
On the right side on a pinball machine lays a flash with optical trigger. It will flash also if the first goes off.
This second strobe bounces off the white ceiling onto the playfield (although it would be better if it were closer).
In front of the game is a tripod to mount my camera on.
I know this article became quite long, and there's a lot of information in it. I hope it's not too overwhelming, it was certainly not meant to be ! Some parts are important and come back all the time - the basics for lighting a backglass or a playfield are not that different. So just read everything, the whole article, so you know what's possible, and then later come back and go in detail in what interests you when you want to make a certain type of picture.
You have to try yourself a lot of the techniques and tricks I explain. This is not meant a guide to be strictly followed. Depending on your gameroom, your camera (dslr or compact), .. you may have to do the opposite of what works for me. But at least you know the variables, know what makes a difference, and then just try it yourself and see what gives you the best results. Experiment a lot, one step at a time. Learn from your mistakes.
Parts of this tutorial:
- Introduction
- Photography 101
- Backglasses
- Playfields
- Pinball closeups
- Plastic ramps